4. Installation and Project Structure
4.1. Prerequisites
The Cherab package requires Python 3.5+, numpy, scipy, matplotlib and Raysect. Scipy version 0.13 or higher is recommended. IPython is recommended for interactive use.
4.2. Project Structure
Cherab is a large code framework consisting of a main core package and many smaller feature packages. The overall structure of the framework is best visualised as onion shells. The full project structure is most relevant for researchers in fusion plasma physics. Researchers in other areas such as industrial plasmas and astrophysics will only require layers 1, 2 for their applications.
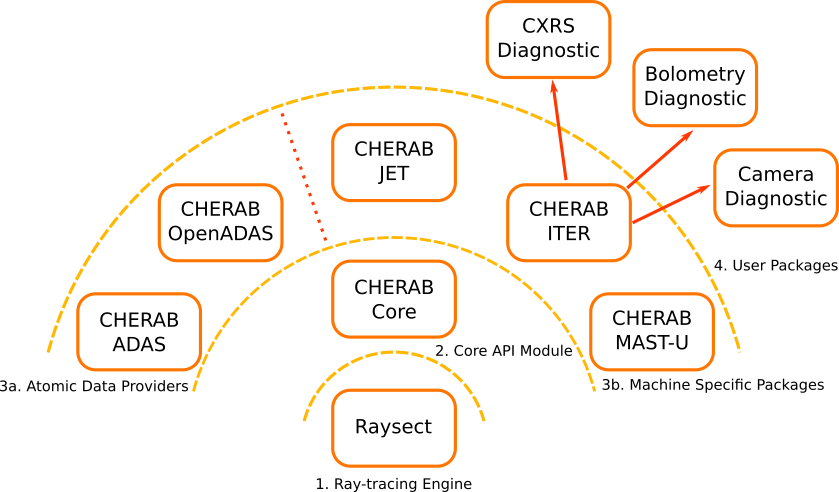
Caption: A high level diagram illustrating the structure of the Cherab framework.
1. Ray-tracing Engine: Cherab was built on top of a ray-tracing engine to provide all the core ray-tracing functionality, mesh handling, etc. Raysect is currently the only ray-tracing engine supported, but the framework has been designed such that this component is interchangeable. Support for other ray-tracers may be added in the future.
2. Core API Module: The cherab package defines all the API interfaces for the whole framework. It defines all the core functionality such as: how plasmas are defined and the properties that can be computed from them; the types of atomic data that can be used in spectroscopic calculations; and the types of plasma emission that Cherab can calculate. This package is strictly managed by the Cherab development team.
3a. Atomic Data Providers: Almost all of the plasma emission models implemented in Cherab require some type of atomic data for their calculations. The base types of reaction rates and photon emissivity coefficients are defined in the Core API Module, cherab. A default atomic data source module based on the OpenADAS project, is included in the package. In future other atomic data sources, such as the ALADDIN database for example, could be made available through additional packages.
3b. Machine Specific Packages: These components are for functionality associated with a specific fusion experiment. For example, each experiment tends to have its own systems for loading and saving experiment/simulation data. These packages allow the local facility experts to provide models and diagnostic settings that are unique to their experiments.
4. User Packages: This is the layer where most Cherab users will do their work. Code in this layer will usually take the form of scripts configured for a particular analysis pipeline such as performing a synthetic diagnostic simulation or fitting some measured data. These projects may just be collections of scripts owned by diagnostic responsible officers or they could be organised into formal packages.
4.3. Installation
Users will generally just install the core package and the specific feature packages they
need for their work. For example, users working on the JET tokamak will require the
cherab package and the cherab-jet
package. The core cherab package is available through pip. The additional fusion specific
packages, offering extra functionality, should be cloned from their respective repositories.
4.3.1. Installing through Pip
Cherab is available from the python package repository pypi. Unless developing new code for a cherab package, most users should use the latest versioned release packages available through pypi.
The easiest way to install Cherab with OpenADAS is using pip:
pip install cherab
This will either install a binary package or build Cherab from source (which may take some time).
If you don’t have administrator access to install the packages, add the --user flag to the above
line to install the packages under your own user account. Alternatively, consider using a
virtual environment to avoid the risk of
conflicting versions of packages in your Python environment.
By default, pip will install from wheel archives on PyPI. If a binary wheel is not available for
your version of Python, or if you are installing from source in editable mode for development (see
below), the package will be compiled locally on your machine. Compilation is done in parallel by
default, using all available processors, but can be overridden by setting the environment variable
CHERAB_NCPU to the number of processors to use.
4.3.2. Installing from source
If pip is not available the source files can be downloaded from pypi or from our development repository. Once you have the source files, locate the folder containing setup.py and run:
python setup.py install
If all the required dependencies are present (cython, numpy, scipy, matplotlib and raysect), this should
start the Cherab compilation and installation process. If you don’t have administrator access to install
the package, add the --user flag to the above line to install the package under your own user account.
As all the Cherab packages are dependent on the core cherab package, this package must be installed first.
Note that other packages may have their own inter-dependencies, see the specific package documentation for
more information.
4.3.3. Installing for development
When developing cherab it is usually preferred that the packages be installed in “develop” mode. Clone the project from the development repository, locate the folder containing setup.py and run:
pip install -e .
The alternative command if pip is not available is:
python setup.py develop
Either command will cause the original installation folder to be added to the
site-package path. Modifications to the code will therefore be visible to python next
time the code is imported. If you are modifying Cython source files then run
./dev/build.sh to re-build those files in order for the changes to be visible. A
virtual environment, or the --user flag, should be used if you do not have
administrative permission for your python installation.
When developing new features for Cherab, the development branch should be used as the base.
4.4. Configuring Atomic Data
Regardless of the method you used to install Cherab, you will need a valid atomic data source for your calculations. Cherab provides a default atomic data source through the OpenADAS module. To use this module it is necessary to obtain the atomic data files from the OpenADAS web archive. An automated download script is provided to download and install the most common atomic data files. This data is required to run many of the demos supplied with Cherab. To run the script please enter the following commands in a python terminal:
>>> from cherab.openadas.repository import populate
>>> populate()
4.5. Testing
A selection of test scripts can be run with the nose testing framework. These are routinely
run on the development version. Running ./dev/test.sh at the terminal in the source directory
should run all of these tests to completion without errors or failures.
Many of the demos used throughout the documentation are distributed with the source code in
the demo folder.